Flutter 시작하기
카테고리: Flutter, 작성:Table of contents
0. 튜토리얼 참고 사이트
1. 개발 환경 구축
Flutter SDK 다운로드
링크: https://docs.flutter.dev/get-started

SDK를 다운로드하고, 압축을 풀어준 뒤에, 윈도우 Path에 해당 fultter\bin 경로를 추가하여준다.
그 뒤, fluuter doctor를 실행하면 몇 가지 오류가 뜬다.
flutter doctor
오류 안내에 따라, 추가로 필요한 몇가지를 더 설치해야 한다.
Android Studio 설치
링크: https://developer.android.com/studio
다운로드 및 압축풀기
안드로이드 스튜디오 실행 (studio64.exe)
안드로이드 스튜디오 내에서 SDK Manager(Android Studio Setup Wizard)를 통해 아래 요소들을 설치한다.
- Android SDK
- Android SDK Command-line Tools
- Android SDK Build-Tools 설치
완료 후, fultter가 참조할 경로 세팅을 해준다.
flutter config --android-studio-dir <directory>
Visual Studio 설치
링크: https://visualstudio.microsoft.com/ko/downloads/
다운로드 및 설치파일 실행
C++ 모바일 개발, C++ 데스크탑 개발 선택하여 설치
Java(JDK) 설치
링크: https://www.oracle.com/kr/java/technologies/downloads/#jdk19-windows
설치버전 다운로드 및 설치

flutter doctor 오류 모음
unable to find bundled java version 오류
Android Studio 경로 내의 jbr 폴더의 내용을 jre 폴더에 붙여넣기로 해결
Android license status unknown.
(미해결)
Windows Version (Unable to confirm if installed Windows version is 10 or greater)
(미해결)
3. 샘플 코드 실행
VS Code Extension 세팅
Install Extensions 에서 Flutter 를 선택하여 설치한다. (Dart 도 함께 설치됨)
project 생성
Command Palette 에서 Flutter: New Project 를 선택하고, Application을 선택
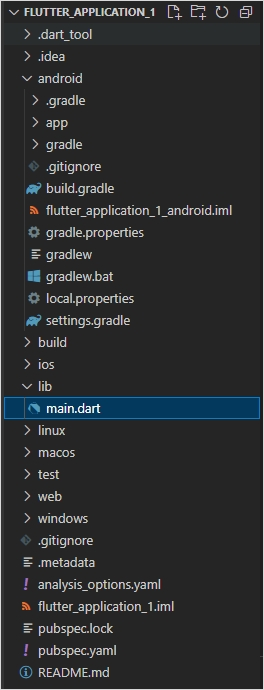
앱이 만들어질 디렉토리의 상위 디렉토리를 선택한 뒤, 앱 이름을 지정하면 잠시 뒤, 프로젝트가 생성되고 main.dart가 열린다.
프로젝트 구조는 다음과 같다.

샘플 코드 보기
메인 코드라 할 수 있는 main.dart 코드는 lib 디렉토리 밑에 만들어지며, 코드 전체는 아래와 같다.
import 'package:flutter/material.dart';

void main() {
  runApp(const MyApp());
}

class MyApp extends StatelessWidget {
  const MyApp({super.key});

  // This widget is the root of your application.
  @override
  Widget build(BuildContext context) {
    return MaterialApp(
      title: 'Flutter Demo',
      theme: ThemeData(
        // This is the theme of your application.
        //
        // Try running your application with "flutter run". You'll see the
        // application has a blue toolbar. Then, without quitting the app, try
        // changing the primarySwatch below to Colors.green and then invoke
        // "hot reload" (press "r" in the console where you ran "flutter run",
        // or simply save your changes to "hot reload" in a Flutter IDE).
        // Notice that the counter didn't reset back to zero; the application
        // is not restarted.
        primarySwatch: Colors.blue,
      ),
      home: const MyHomePage(title: 'Flutter Demo Home Page'),
    );
  }
}

class MyHomePage extends StatefulWidget {
  const MyHomePage({super.key, required this.title});

  // This widget is the home page of your application. It is stateful, meaning
  // that it has a State object (defined below) that contains fields that affect
  // how it looks.

  // This class is the configuration for the state. It holds the values (in this
  // case the title) provided by the parent (in this case the App widget) and
  // used by the build method of the State. Fields in a Widget subclass are
  // always marked "final".

  final String title;

  @override
  State<MyHomePage> createState() => _MyHomePageState();
}

class _MyHomePageState extends State<MyHomePage> {
  int _counter = 0;

  void _incrementCounter() {
    setState(() {
      // This call to setState tells the Flutter framework that something has
      // changed in this State, which causes it to rerun the build method below
      // so that the display can reflect the updated values. If we changed
      // _counter without calling setState(), then the build method would not be
      // called again, and so nothing would appear to happen.
      _counter++;
    });
  }

  @override
  Widget build(BuildContext context) {
    // This method is rerun every time setState is called, for instance as done
    // by the _incrementCounter method above.
    //
    // The Flutter framework has been optimized to make rerunning build methods
    // fast, so that you can just rebuild anything that needs updating rather
    // than having to individually change instances of widgets.
    return Scaffold(
      appBar: AppBar(
        // Here we take the value from the MyHomePage object that was created by
        // the App.build method, and use it to set our appbar title.
        title: Text(widget.title),
      ),
      body: Center(
        // Center is a layout widget. It takes a single child and positions it
        // in the middle of the parent.
        child: Column(
          // Column is also a layout widget. It takes a list of children and
          // arranges them vertically. By default, it sizes itself to fit its
          // children horizontally, and tries to be as tall as its parent.
          //
          // Invoke "debug painting" (press "p" in the console, choose the
          // "Toggle Debug Paint" action from the Flutter Inspector in Android
          // Studio, or the "Toggle Debug Paint" command in Visual Studio Code)
          // to see the wireframe for each widget.
          //
          // Column has various properties to control how it sizes itself and
          // how it positions its children. Here we use mainAxisAlignment to
          // center the children vertically; the main axis here is the vertical
          // axis because Columns are vertical (the cross axis would be
          // horizontal).
          mainAxisAlignment: MainAxisAlignment.center,
          children: <Widget>[
            const Text(
              'You have pushed the button this many times:',
            ),
            Text(
              '$_counter',
              style: Theme.of(context).textTheme.headlineMedium,
            ),
          ],
        ),
      ),
      floatingActionButton: FloatingActionButton(
        onPressed: _incrementCounter,
        tooltip: 'Increment',
        child: const Icon(Icons.add),
      ), // This trailing comma makes auto-formatting nicer for build methods.
    );
  }
}
실행
코드의 실행은 F5 또는 메뉴의 Run > Start Debugging을 통해 한다.
실행 전에 연결된 디바이스를 설정할 수 있는데, VS Code 하단 부분을 확인하면 된다.

그리고 콘솔 명령으로 flutter devices를 치면 연결된 디바이스를 확인할 수 있다.

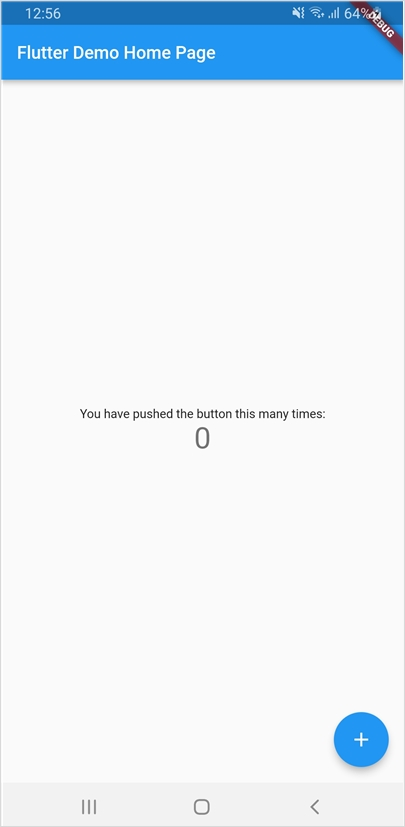
실행화면은 아래와 같다.

마무리
이상입니다. 다음 포스팅에서 계속해서 진행해보도록 하겠습니다.
※ 'Flutter' 카테고리의 다른 글