react 프로젝트 시작하기(next.js)
카테고리: React, 작성:Table of contents
참고 사이트
react 프로젝트를 시작하는 방법을 공식문서에서 찾다보니, 개념설명은 되어있는데 프로젝트를 초기세팅하는 방법을 찾기가 어려웠습니다. 계속 찾다보니 next.js프레임워크를 사용하도록 소개되어있어서, next.js를 함께 시작해보았습니다.
- https://react.dev/learn (react 공식 가이드)
- https://react.dev/learn/start-a-new-react-project (react 설치 안내)
- https://nextjs.org/learn/basics/create-nextjs-app/setup (next.js app 시작하기)
next.js 프로젝트 초기 생성
먼저, 새로운 프로젝트를 생성하고싶은 상위 디렉토리에서 아래 명령어를 실행합니다. 아래의 nextjs-blog 는 생성될 프로젝트 디렉토리 이름입니다.
npx create-next-app@latest nextjs-blog --use-npm --example "https://github.com/vercel/next-learn/tree/master/basics/learn-starter"
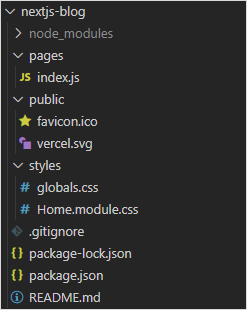
아래와 같이 디렉토리 구조가 만들어집니다.
next.js 프로젝트 실행시키기
디렉토리에 들어가 아래 실행 명령으로 앱을 구동해봅니다.
npm run dev
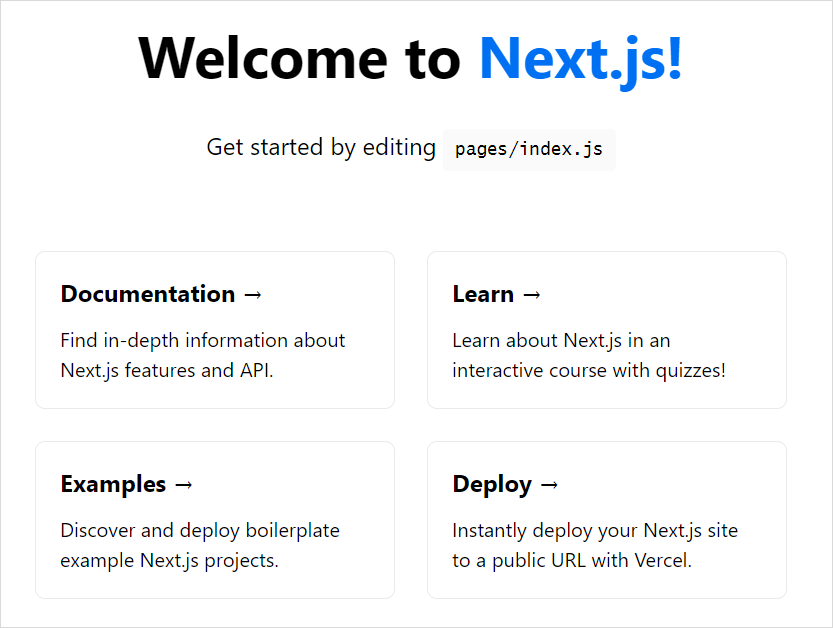
아래와 같이 localhost:3000 으로 구동된 웹 페이지를 볼 수 있습니다. pages/index.js 를 통해 앱 코딩을 시작할 수 있다고 안내되어 있습니다.
next.js 프로젝트 초기 코드 살펴보기
아래는 최초 생성된 코드를 첨부하여 보았습니다.
import Head from 'next/head';
import styles from '../styles/Home.module.css';
export default function Home() {
return (
<div className={styles.container}>
<Head>
<title>Create Next App</title>
<link rel="icon" href="/favicon.ico" />
</Head>
<main>
<h1 className={styles.title}>
Welcome to <a href="https://nextjs.org">Next.js!</a>
</h1>
<p className={styles.description}>
Get started by editing <code>pages/index.js</code>
</p>
<div className={styles.grid}>
<a href="https://nextjs.org/docs" className={styles.card}>
<h3>Documentation →</h3>
<p>Find in-depth information about Next.js features and API.</p>
</a>
<a href="https://nextjs.org/learn" className={styles.card}>
<h3>Learn →</h3>
<p>Learn about Next.js in an interactive course with quizzes!</p>
</a>
<a
href="https://github.com/vercel/next.js/tree/master/examples"
className={styles.card}
>
<h3>Examples →</h3>
<p>Discover and deploy boilerplate example Next.js projects.</p>
</a>
<a
href="https://vercel.com/import?filter=next.js&utm_source=create-next-app&utm_medium=default-template&utm_campaign=create-next-app"
className={styles.card}
>
<h3>Deploy →</h3>
<p>
Instantly deploy your Next.js site to a public URL with Vercel.
</p>
</a>
</div>
</main>
<footer>
<a
href="https://vercel.com?utm_source=create-next-app&utm_medium=default-template&utm_campaign=create-next-app"
target="_blank"
rel="noopener noreferrer"
>
Powered by{' '}
<img src="/vercel.svg" alt="Vercel" className={styles.logo} />
</a>
</footer>
<style jsx>{`
main {
padding: 5rem 0;
flex: 1;
display: flex;
flex-direction: column;
justify-content: center;
align-items: center;
}
footer {
width: 100%;
height: 100px;
border-top: 1px solid #eaeaea;
display: flex;
justify-content: center;
align-items: center;
}
footer img {
margin-left: 0.5rem;
}
footer a {
display: flex;
justify-content: center;
align-items: center;
text-decoration: none;
color: inherit;
}
code {
background: #fafafa;
border-radius: 5px;
padding: 0.75rem;
font-size: 1.1rem;
font-family: Menlo, Monaco, Lucida Console, Liberation Mono,
DejaVu Sans Mono, Bitstream Vera Sans Mono, Courier New, monospace;
}
`}</style>
<style jsx global>{`
html,
body {
padding: 0;
margin: 0;
font-family: -apple-system, BlinkMacSystemFont, Segoe UI, Roboto,
Oxygen, Ubuntu, Cantarell, Fira Sans, Droid Sans, Helvetica Neue,
sans-serif;
}
* {
box-sizing: border-box;
}
`}</style>
</div>
)
}
다음 과정
이후부터의 코드수정을 통한 next.js 학습은 아래 페이지에서 확인하실 수 있습니다.
https://nextjs.org/learn/basics/create-nextjs-app/editing-the-page
다음으로는 만들어진 프로젝트를 github에 올리고, firebase hosting 을 통해 배포해보도록 하겠습니다.
※ 'React' 카테고리의 다른 글